Securing your home with surveillance cameras offers invaluable peace of mind, providing a vigilant eye over your property. However, the task of mounting these cameras can seem daunting, especially when dealing with diverse exterior surfaces like flexible siding or robust brick. Choosing the correct mounting method is crucial not only for the camera’s stability and effectiveness but also for preserving the integrity of your home’s exterior. This comprehensive guide will equip you with the knowledge and practical steps to confidently install your security cameras, whether your home is clad in vinyl or constructed with brick.
Understanding Your Exterior Walls: Siding vs. Brick
Before you begin any installation, it’s essential to understand the unique characteristics of your home’s exterior. Different materials require different approaches to ensure a secure and damage-free mounting process.
What is Siding?
|
Our Picks for the Best Security Camera in 2026
As an Amazon Associate I earn from qualifying purchases.
|
||
| Num | Product | Action |
|---|---|---|
| 1 | TP-Link Tapo 1080P Indoor Security Camera for Baby Monitor, Dog Camera w/Motion Detection, 2-Way Audio Siren, Night Vision, Cloud & SD Card Storage, Works w/Alexa & Google Home (Tapo C100) |

|
| 2 | Tapo 1080P Indoor Pan/Tilt Wired Security Camera - Works as a Baby & Pet Monitor, Motion Detection, 2-Way Audio, Siren, Night Vision, Subscription-Free Local Storage or Optional Cloud, Black, C201 |
|
| 3 | aosu Security Cameras Outdoor Wireless, 4 Cam-Kit, No Subscription, Solar-Powered, Home Security Cameras System with 360° Pan & Tilt, Auto Tracking, 2K Color Night Vision, Easy Setup, 2.4 & 5GHz WiFi |
|
| 4 | Google Nest Cam with Floodlight - Outdoor Camera - Floodlight Security Camera, White, 1 Count (Pack of 1) |
|
| 5 | 2K Cameras for Home Security-Outdoor/Indoor Camera for Dog/Cat/Pet/Nanny/Baby/Elderly, Color Night Vision, White Light, Siren, 24/7 SD Recordings, Works with Alexa, Plug in (C1-White-2pack-2.4G) |
|
| 6 | Tapo 2K+ Indoor/Outdoor Wired Security Camera - 2024 PCMag Editors' Choice, Person/Pet/Vehicle Detection, Baby Monitoring, Color Night Vision, Subscription-Free Local Storage or Optional Cloud, C120 |
|
| 7 | WYZE Cam Pan v3 Indoor/Outdoor IP65-Rated 1080p Pan/Tilt/Zoom Wi-Fi Smart Home Security Camera with Color Night Vision, 2-Way Audio, Compatible with Alexa & Google Assistant, White, 2-Pack |
|
| 8 | WYZE Bulb Cam Security Camera, 2K HD Outdoor Light Bulb Camera, Color Night Vision, Dimmable LED Bulb, Motion Detection, Siren Alarm, Works w/Alexa/Google Assistant. Free Expert Support |
|
| 9 | Google Nest Cam Outdoor (Wired, 2nd Gen) - 2 Pack - Security Camera with 2K Video and Gemini, Night Vision, 2-Way Audio - Works with Google Home - 2025 Model - Snow |
|
| 10 | 2K No Drill Window Camera-2 Pack 2.4Ghz & 5Ghz WiFi Cameras for Home Security for Indoor & Outdoor Monitoring, Anti-Glare Color Night Vision, Human Detection, 24/7 Recording, Ideal for Apartment, K1 |
|
Siding, particularly vinyl siding, is a popular choice for many homes due to its durability and low maintenance. Made from polyvinyl chloride (PVC), vinyl siding is designed to protect your home from the elements while offering an appealing aesthetic. Its key characteristic for mounting is its flexibility and the fact that it’s typically installed in overlapping panels, creating gaps. These gaps can be leveraged for non-invasive mounting solutions. Behind the siding, there’s usually a layer of sheathing and then the structural studs of your home.
What is Brick?
Brick walls, on the other hand, are solid and robust masonry structures known for their strength and longevity. Mounting on brick involves drilling into a hard, dense material. You typically have two options for drilling: into the mortar joints between bricks or directly into the bricks themselves. Drilling into mortar is often preferred as it’s easier to repair if the camera is removed, though drilling into the brick itself can sometimes provide a stronger hold, especially with older, softer bricks.
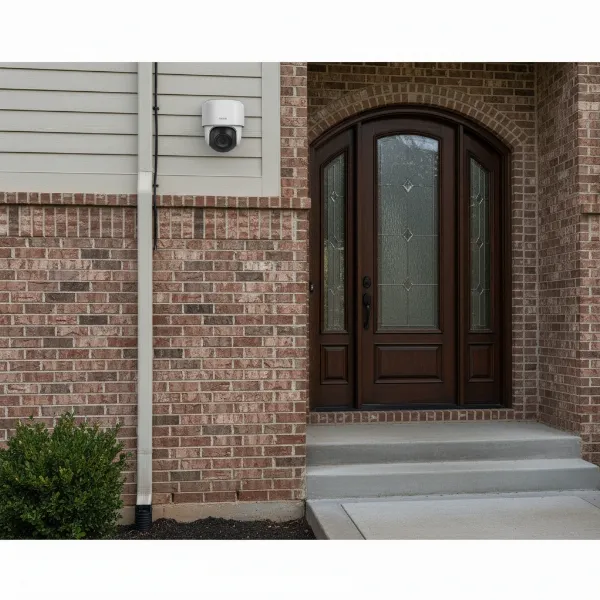 Outdoor security camera mounted on a house with both vinyl siding and brick walls.
Mounting a Security Camera on Siding
Mounting cameras on siding, especially vinyl, often prioritizes methods that avoid drilling to prevent damage and maintain the wall’s weather seal.
The No-Drill Approach for Siding (Recommended)
For many homeowners, particularly renters or those hesitant to drill, non-invasive methods are ideal for siding. These options leverage the design of siding without penetrating the material.
- Siding Hooks/Clips: These clever clips are specifically designed to slide underneath the overlapping panels of vinyl siding. Once in place, they provide a stable hook from which you can attach your camera’s mounting bracket with screws.
- Advantages: This method leaves no holes, causes no damage to the siding, and allows for easy repositioning of the camera. It’s perfect for temporary setups or if you plan to move the camera in the future.
- Installation Steps: Select your ideal location, ensuring a clear view. Gently lift a siding panel edge and slide the hook underneath. Ensure it’s snug and secure. Then, attach your camera mount to the clips using the provided screws (these screws only go into the hook, not the wall). Finally, secure your camera to its mount.
- Considerations: Ensure the hooks are placed out of easy reach to prevent tampering or theft. These mounts are best for lightweight cameras.
- Gutter Mounts: If your home has gutters, a gutter mount can be an excellent way to position a camera high up for a broad view. These mounts typically clamp onto the gutter’s edge without the need for drilling.
- Advantages: Offers an elevated perspective and completely bypasses wall damage.
- Considerations: Not all homes have suitable gutters, and the stability of the gutter itself should be considered, especially in high winds.
- Heavy-Duty Adhesive Tapes (Use with Caution): Certain industrial-grade, double-sided adhesive tapes are designed for outdoor use and can hold lightweight cameras.
- Advantages: Offers a quick, drill-free installation.
- Disadvantages: Their reliability can vary greatly with weather conditions (temperature fluctuations, humidity) and the weight of the camera. There’s also a higher risk of the camera falling or being easily stolen.
- Best for: Very lightweight cameras in sheltered, low-wind areas, and only for temporary solutions. Ensure the siding surface is perfectly clean and dry for optimal adhesion.
Drilling into Siding (When Necessary)
While less common for vinyl siding due to potential damage, drilling may be necessary for heavier cameras or when a wired connection requires routing a cable through the wall.
- When to Consider: If you have a particularly heavy camera, need a permanent installation, or require wired power/data that must penetrate the wall directly behind the camera.
- Tools: You’ll need a standard drill, pilot bits appropriate for both siding and the underlying wall material (wood or composite), and exterior-grade screws or anchors. A stud finder is crucial if you plan to drill into a structural stud for maximum stability.
- Process:
- Locate a Stud: Use a stud finder to identify a wooden stud behind the siding if possible. This provides the most secure anchor point.
- Drill Pilot Holes: Carefully drill pilot holes through the siding and into the stud or sheathing. Start with a small bit and gradually increase to the size required for your screws or anchors.
- Mount the Camera: Attach the camera’s mounting bracket using appropriate screws.
- Preventing Water Damage: This step is critical. Apply a generous bead of outdoor-grade silicone caulk around the perimeter of the mount and into any screw holes before and after fastening. This creates a waterproof seal, preventing moisture from seeping behind your siding and causing costly damage.
Mounting a Security Camera on Brick
Mounting on brick typically involves drilling, which provides the most secure and long-lasting installation for heavy-duty outdoor cameras.
Drilling into Brick (Most Secure Method)
For a truly robust and permanent installation on brick, drilling is the preferred method.
- Preparation:
- Tools: You will need a hammer drill (essential for brick and masonry), appropriate carbide-tipped masonry drill bits (the size should match your chosen anchors), a pencil for marking, a level, and safety glasses.
- Safety First: Always wear safety glasses to protect your eyes from flying debris and dust when drilling into masonry. Gloves can also be helpful.
- Location: Mark your mounting points carefully. Decide whether to drill into the mortar joints or directly into the brick. Drilling into mortar is generally easier and less damaging to the brick itself, making future repairs simpler. However, some prefer drilling directly into the brick for a potentially stronger hold, especially if the mortar is old or crumbly.
- Installation Steps:
- Drill Pilot Holes: Using your hammer drill with a masonry bit, drill pilot holes at the marked locations. Start slowly, then increase speed, applying steady pressure. Periodically pull the drill bit out to clear dust from the hole. Drill the hole slightly deeper than the length of your chosen anchor.
- Insert Anchors: For brick, common anchors include Tapcon screws (which create their own threads), plastic expansion anchors (often called “rawlplugs” or “mollys”), or specialized sleeve anchors. Insert the appropriate anchors into the drilled holes. For plastic anchors, gently tap them flush with the surface.
- Mount Camera: Position your camera’s mounting bracket over the anchors and secure it with the screws provided with the anchors. Tighten firmly but avoid over-tightening, which can strip the anchors.
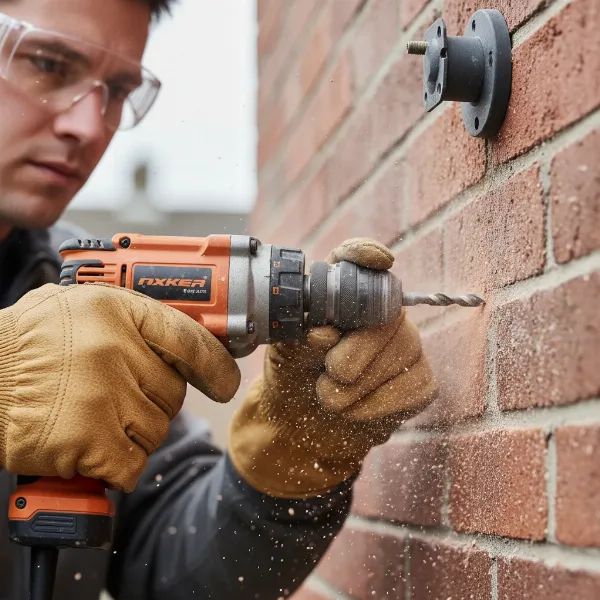 Person drilling a pilot hole into a brick wall for a security camera installation.
- Wire Management: If your camera is wired, plan how the cable will be routed. You can drill a larger hole (at an upward angle to prevent water intrusion) through the wall for the cable to pass inside, or use exterior conduit for protection and a cleaner look. A junction box can also be installed behind the camera to hide wiring connections and provide a flat mounting surface.
- Sealing: Once the camera is mounted, apply outdoor-grade silicone caulk generously around the base of the mount and into any drilled holes (especially where cables enter the wall) to create a watertight seal and prevent moisture intrusion.
Non-Drilling Methods for Brick (For Lightweight Cameras or Temporary Use)
While drilling offers superior security, non-drilling options are available for brick if the camera is lightweight or the installation is temporary.
- Adhesive Strips/3M Industrial Tape: Similar to siding, heavy-duty adhesive strips or 3M industrial tape can be used for very lightweight cameras on clean, dry brick surfaces.
- Advantages: No drilling required, quick to install.
- Disadvantages: Less reliable for long-term outdoor use, especially with varying temperatures and moisture. Only suitable for the lightest cameras and in protected areas.
- Clip Clamp Mounts (for Edges/Pipes): If your brick wall has adjacent structures like pipes, gutters, or fence posts, clip clamp mounts can be used. These mounts attach by clamping onto these existing features.
- Advantages: Highly flexible, easy to reposition, and leaves no damage to the brick.
- Disadvantages: Placement is limited to areas with suitable clamping points.
- Corner Mounts (Adhesive/Tension): Some corner-specific mounts for brick utilize strong adhesives or tension systems to secure a camera without drilling.
- Advantages: Can offer a wide field of view from a corner.
- Disadvantages: Dependent on the strength of the adhesive or the specific geometry of the corner, and may not be as secure as drilled methods.
Essential Considerations for Any Outdoor Camera Installation
Regardless of your chosen mounting surface, several universal factors ensure your security camera system is effective and durable.
- Optimal Placement: Position cameras to cover key entry points like doors, windows, and garages, as well as high-traffic areas such as front porches or driveways. Aim for a mounting height of 8 to 10 feet to keep cameras out of easy reach while maintaining a clear, comprehensive view. Always test the camera’s field of view using its app before finalizing the installation. Avoid pointing cameras directly into strong sunlight or reflective surfaces to prevent glare.
- Weather Protection: Choose cameras with an appropriate IP (Ingress Protection) rating for outdoor use. Always properly seal any drilled holes or cable entry points with outdoor-grade silicone caulk to prevent water and insect infiltration, safeguarding both your camera and your home’s structure.
- Power and Connectivity: Consider whether you have a wired (PoE or power adapter) or wireless (Wi-Fi or battery-powered) camera. For wired cameras, plan your cable routing carefully to conceal wires and protect them from the elements. Ensure battery-powered cameras are easily accessible for recharging, and Wi-Fi cameras have a strong, stable signal.
- Security of the Mount: Even with robust mounting, ensure the camera itself is securely fastened to its bracket to deter theft or tampering. Some mounts offer additional anti-theft features.
Troubleshooting Common Mounting Issues
Even with careful planning, you might encounter issues. Here are solutions to common problems:
- Camera Falling or Loosening: This often indicates an inappropriate mounting method for the camera’s weight or poor installation. For siding, ensure clips are fully engaged and not supporting too much weight. For brick, verify anchors are correctly installed and sufficient for the load. Re-evaluate the mount type and consider a stronger, more permanent solution if necessary.
- Water Infiltration: If you notice signs of moisture around a drilled mount, immediately inspect the caulk and re-seal any gaps or cracks. Ensure cables entering the wall have drip loops to prevent water from running directly into the hole.
- Poor Wi-Fi Signal: If your wireless camera struggles with connectivity, try relocating it closer to your router or installing a Wi-Fi extender. Obstructions like thick walls or metal siding can interfere with signals.
“A security camera is only as good as its installation. The right mounting technique ensures your system remains vigilant, no matter the challenges posed by your home’s exterior.” – A Security Expert at securitycameraon.com
Conclusion
Successfully mounting a Security Camera on siding or brick is a fundamental step toward creating a robust home security system. By understanding the nuances of each material and selecting the appropriate installation technique – whether it’s a non-invasive siding clip or a diligently drilled brick mount – you can ensure your cameras are stable, effective, and weatherproof. Remember to prioritize proper placement, protect against the elements, and periodically inspect your installations for lasting performance. With the right approach, you can confidently enhance your home’s safety and enjoy the peace of mind that comes with reliable surveillance.
Ready to take control of your home’s security? Start by assessing your exterior walls and choosing the mounting method that best suits your needs!
Frequently Asked Questions
Can I mount a camera on vinyl siding without drilling?
Yes, absolutely! The most popular and recommended method for vinyl siding involves using specialized siding hooks or clips that slide into the gaps between siding panels, providing a secure anchor point without drilling any holes into your home’s exterior.
What tools do I need to drill into brick?
To drill into brick, you will primarily need a hammer drill and carbide-tipped masonry drill bits. Additionally, you’ll need a pencil, a level, a screwdriver, and crucially, safety glasses to protect your eyes from debris.
How can I protect my security camera from theft once mounted?
To deter theft, mount your camera at an elevated height (8-10 feet) that is difficult to reach without a ladder. For wired cameras, conceal cables to prevent tampering. Some camera models and mounts also offer anti-tamper screws or lockable features for added security.
Is it better to drill into brick or mortar?
Generally, drilling into the mortar joints between bricks is often recommended because mortar is softer and easier to drill into, and any holes are simpler to repair if the camera is removed. Drilling directly into the brick can sometimes provide a stronger hold, but it’s more challenging and leaves a more noticeable hole.
How often should I check my camera mounts?
It is advisable to conduct regular maintenance checks on your camera mounts, especially after severe weather events like strong winds or heavy rain. Look for any signs of loosening, wear, or damage to the mount or sealant, and re-secure or re-seal as needed to maintain optimal performance and weather protection.