Securing your home or business no longer requires invasive drilling or permanent alterations to your property. Whether you’re a renter, aiming to preserve your home’s aesthetics, or simply prefer a less permanent solution, installing a security camera without drilling holes is entirely achievable. This guide will walk you through various effective, drill-free methods, ensuring you can enhance your security with confidence and peace of mind.
Why Opt for Drill-Free Security Camera Installation?
Avoiding drilling offers numerous benefits that extend beyond just protecting your walls. For tenants, it’s often a lease requirement to not make permanent changes, making drill-free options essential. Homeowners might also prefer non-invasive methods to preserve the integrity of their siding, brickwork, or interior finishes. Furthermore, these methods often allow for easier relocation of cameras, providing flexibility as your security needs evolve or if you move to a new property. It democratizes security, making it accessible even for those without specialized tools or DIY expertise.
Popular Drill-Free Security Camera Installation Methods
There’s a wide array of innovative solutions available that allow you to securely mount your security cameras without ever touching a drill. Each method caters to different camera types, surfaces, and environmental conditions.
1. Adhesive Mounts
Adhesive mounts are a straightforward and widely popular method for drill-free camera installation. These solutions leverage strong, weather-resistant adhesive pads, often using industrial-strength tape like 3M, to bond the camera mount directly to a surface.
- Description: Heavy-duty adhesive strips or specialized mounting tapes are applied to the camera base or a separate mounting plate, which is then pressed onto the desired surface.
- Best for: Smooth, clean, flat surfaces like painted walls, windows, vinyl siding, or even brick (with proper surface preparation). They are ideal for lightweight cameras in indoor or sheltered outdoor environments.
- Pros: Extremely easy to install, leaves no holes or damage when removed correctly, and offers versatility for various surfaces.
- Cons: Requires meticulous surface preparation for optimal adhesion, may degrade or lose stickiness in extreme weather conditions (especially outdoors), and is generally not suitable for heavier cameras or high-vibration areas.
- How-to: Thoroughly clean the mounting surface with alcohol and let it dry completely. Apply the adhesive strip to the back of the camera mount, then firmly press the mount against the chosen spot for at least 30 seconds. Allow the adhesive to cure for several hours (as per manufacturer’s instructions) before attaching the camera.
|
Our Picks for the Best Security Camera in 2026
As an Amazon Associate I earn from qualifying purchases.
|
||
| Num | Product | Action |
|---|---|---|
| 1 | TP-Link Tapo 1080P Indoor Security Camera for Baby Monitor, Dog Camera w/Motion Detection, 2-Way Audio Siren, Night Vision, Cloud & SD Card Storage, Works w/Alexa & Google Home (Tapo C100) |

|
| 2 | 2K Cameras for Home Security-Outdoor/Indoor Camera for Dog/Cat/Pet/Nanny/Baby/Elderly, Color Night Vision, White Light, Siren, 24/7 SD Recordings, Works with Alexa, Plug in (C1-White-2pack-2.4G) |
|
| 3 | aosu Security Cameras Outdoor Wireless, 4 Cam-Kit, No Subscription, Solar-Powered, Home Security Cameras System with 360° Pan & Tilt, Auto Tracking, 2K Color Night Vision, Easy Setup, 2.4 & 5GHz WiFi |
|
| 4 | Tapo 1080P Indoor Pan/Tilt Wired Security Camera - Works as a Baby & Pet Monitor, Motion Detection, 2-Way Audio, Siren, Night Vision, Subscription-Free Local Storage or Optional Cloud, Black, C201 |
|
| 5 | Google Nest Cam Outdoor (Wired, 2nd Gen) - 2 Pack - Security Camera with 2K Video and Gemini, Night Vision, 2-Way Audio - Works with Google Home - 2025 Model - Snow |
|
| 6 | 2K No Drill Window Camera-2 Pack 2.4Ghz & 5Ghz WiFi Cameras for Home Security for Indoor & Outdoor Monitoring, Anti-Glare Color Night Vision, Human Detection, 24/7 Recording, Ideal for Apartment, K1 |
|
| 7 | Google Nest Cam with Floodlight - Outdoor Camera - Floodlight Security Camera, White, 1 Count (Pack of 1) |
|
| 8 | Tapo 2K+ Indoor/Outdoor Wired Security Camera - 2024 PCMag Editors' Choice, Person/Pet/Vehicle Detection, Baby Monitoring, Color Night Vision, Subscription-Free Local Storage or Optional Cloud, C120 |
|
| 9 | WYZE Cam Pan v3 Indoor/Outdoor IP65-Rated 1080p Pan/Tilt/Zoom Wi-Fi Smart Home Security Camera with Color Night Vision, 2-Way Audio, Compatible with Alexa & Google Assistant, White, 2-Pack |
|
| 10 | WYZE Bulb Cam Security Camera, 2K HD Outdoor Light Bulb Camera, Color Night Vision, Dimmable LED Bulb, Motion Detection, Siren Alarm, Works w/Alexa/Google Assistant. Free Expert Support |
|
2. Magnetic Mounts
For cameras designed with magnetic bases, or with a little creativity, magnetic mounts offer a convenient and damage-free installation. These mounts rely on powerful magnets to secure the camera to ferrous metal surfaces.
- Description: Some security cameras come with built-in magnetic bases that adhere directly to metal. Alternatively, you can attach a metal plate (with adhesive) to a non-magnetic surface, then use a magnetic camera.
- Best for: Metal door frames, window frames, refrigerators, metal poles, or even discreetly behind vinyl siding if a metal plate can be inserted.
- Pros: Effortless installation and repositioning, no surface damage, and a very clean aesthetic if the camera is designed for it.
- Cons: Limited to surfaces with magnetic properties or requiring additional setup, and the camera might be easier to remove (and potentially steal) compared to more permanently mounted options.
3. Clamp Mounts
Clamp mounts provide a sturdy, temporary, and non-damaging solution by gripping onto existing structures. They are particularly effective for outdoor installations where drilling might be problematic.
- Description: These mounts utilize adjustable clamps, such as gutter clamps, C-clamps, or railing clamps, to attach securely to various architectural elements.
- Best for: Gutters, fences, railings, eaves, pipes, or other ledges and overhangs around your property.
- Pros: Offers excellent stability and security for outdoor cameras, highly adjustable for optimal viewing angles, and causes no damage to the primary structure.
- Cons: Requires a suitable structure to clamp onto, and the aesthetic might be less discreet than other methods.
4. Suction Cup Mounts
Suction cup mounts are a temporary yet effective solution for smooth, non-porous surfaces. They excel in situations where a quick, removable setup is desired, often for indoor or window monitoring.
- Description: Designed with robust suction cups, these mounts create a vacuum seal with the surface to hold the camera in place.
- Best for: Windows, glass doors, polished tiles, or other very smooth, flat, and non-textured surfaces. They are primarily used indoors or in very sheltered outdoor spots.
- Pros: Extremely easy to install and remove, leaves absolutely no residue or damage, and offers quick repositioning.
- Cons: Not suitable for textured, porous, or uneven surfaces; can lose suction over time, especially with temperature changes or dust accumulation; generally less secure for long-term outdoor use.
5. Utilizing Stands or Existing Furniture
Sometimes, the simplest solution is the best. Many indoor security cameras are designed to be freestanding, allowing them to blend seamlessly into your home environment without any mounting hardware.
- Description: Placing the camera directly on a shelf, table, bookcase, or cabinet, or using a dedicated tripod stand.
- Best for: Indoor use, areas where discreet placement is preferred, or temporary monitoring setups.
- Pros: Absolutely no installation required, maximum flexibility for placement, and completely damage-free.
- Cons: Limited to flat surfaces, can be easily moved or knocked over, and offers the least security against tampering or theft.
6. Siding Clips and Hooks
For homes with vinyl siding, specialized clips offer an ingenious way to mount cameras without drilling into the siding itself. These clips utilize the existing gaps in the siding to secure the camera.
- Description: Siding clips slide under the overlapping edges of vinyl siding panels, creating a secure attachment point without penetrating the material. Small, damage-free adhesive hooks can also be used for lighter cameras on smooth surfaces.
- Best for: Houses with vinyl or aluminum siding.
- Pros: Minimally invasive, preserves the siding, and is generally tenant-friendly.
- Cons: Only works with specific types of siding, and the weight capacity might be limited.
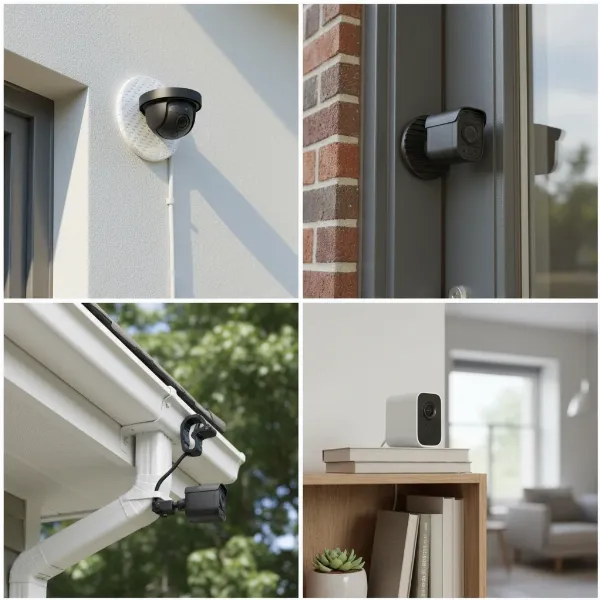 Various drill-free security camera installation methods demonstrated on different surfaces
Essential Considerations for Drill-Free Installation
While drill-free methods offer convenience, it’s crucial to consider several factors to ensure your security camera system is effective and reliable.
Camera Type and Weight
The success of a drill-free installation often hinges on the camera itself. Lighter, more compact cameras are generally better suited for adhesive, magnetic, and suction cup mounts. Heavy-duty clamps can accommodate heavier outdoor cameras, but always check the weight limits of your chosen mounting accessory. Battery-powered wireless cameras are often ideal, as they eliminate the need to run and secure power cables, further simplifying the installation process.
Surface Preparation
This step is paramount for adhesive and suction cup methods. A clean, dry, and smooth surface is non-negotiable for maximum adhesion. Any dust, dirt, grease, or moisture will significantly compromise the bond, leading to your camera potentially falling. For brick or textured surfaces, ensure they are thoroughly brushed clean and completely dry before applying heavy-duty outdoor-rated adhesives.
Environmental Factors
- Outdoor Installations: If installing outdoors, weather resistance is key. Choose adhesives, clamps, and cameras rated for outdoor use, capable of withstanding rain, wind, UV exposure, and temperature fluctuations. Extreme cold can make adhesives brittle, while intense heat can soften them, leading to detachment.
- Indoor Installations: While less demanding, consider humidity levels and extreme temperature swings near windows or heating vents, which can affect adhesive performance.
Security and Stability
A security camera is only effective if it stays in place and isn’t easily tampered with or stolen. Always ensure your drill-free mount provides a firm and stable attachment. Periodically check the mount for any signs of loosening, especially after severe weather events. For higher security needs, methods like robust clamp mounts might be preferred over easily removable options like suction cups, particularly in accessible outdoor locations.
Wire Management (if applicable)
Even with drill-free camera mounts, wired cameras still require careful consideration for cable routing. Exposed wires can be an eyesore, a tripping hazard, or an easy target for vandals. For indoor setups, use adhesive cable clips, hide wires behind baseboards or furniture, or utilize flat, paintable cable covers. For outdoor installations, consider flat Ethernet cables that can run discreetly along window frames or under eaves, secured with weather-resistant adhesive clips or ties.
Tips for a Successful Drill-Free Security Camera Setup
To maximize the effectiveness and longevity of your drill-free security camera system, follow these practical tips.
- Test Placement Before Committing: Before firmly attaching your camera, temporarily hold it in your desired location. Check the camera’s field of view on your smartphone app and ensure a strong Wi-Fi signal. This saves you from having to re-mount it later.
- Adhere to Manufacturer’s Instructions: Always read and follow the specific guidelines provided by both your camera manufacturer and the mounting accessory manufacturer. Pay close attention to recommended curing times for adhesives and weight limits for mounts.
- Prioritize Safety During Installation: If working with wired cameras or at heights, always turn off power to the relevant circuits and use a stable ladder. Personal safety should never be overlooked.
- Consider Aesthetics and Discretion: While focusing on functionality, also think about how the camera and its mount blend with your property. Hidden wires and discreetly placed mounts can enhance both security and curb appeal.
- Implement Regular Maintenance Checks: Periodically inspect your drill-free mounts for any signs of wear, loosening, or damage. Clean camera lenses as needed to ensure clear footage, and update camera firmware for optimal performance and security.
Common Challenges and Troubleshooting
Even with careful planning, you might encounter some issues. Here’s how to address common problems with drill-free camera installations.
- Camera Falling: This is often due to insufficient surface preparation, using the wrong type of adhesive for the surface or camera weight, or exposure to extreme environmental conditions. Re-clean the surface thoroughly, consider a stronger adhesive or a different mounting method (e.g., clamp instead of adhesive), and ensure the camera’s weight is within the mount’s limits.
- Poor Viewing Angle or Coverage: If the camera’s view isn’t optimal, reposition it. Adjustable mounts offer flexibility, allowing you to pan, tilt, or zoom the camera’s perspective without moving the entire mount.
- Wi-Fi Connectivity Issues: If your wireless camera constantly loses connection or has a weak signal, try moving it closer to your Wi-Fi router. A Wi-Fi extender or mesh system can also boost signal strength in dead zones. Ensure no large obstructions are blocking the signal path.
- Adhesive Residue Upon Removal: While drill-free methods aim for no damage, some heavy-duty adhesives might leave a residue. Test a small, inconspicuous area first. For removal, gently peel the adhesive while applying heat (e.g., from a hairdryer) to soften it. Residue can often be removed with appropriate cleaners (e.g., rubbing alcohol for non-painted surfaces, or Goo Gone for tougher spots), but always test on a hidden area first.
Conclusion
Installing a security camera without drilling holes is not only feasible but also offers immense flexibility and convenience for property owners and renters alike. By choosing the right method—whether it’s heavy-duty adhesive, magnetic, clamp, or suction cup mounts, or simply utilizing existing furniture—you can effectively monitor your space without causing permanent alterations. Remember to carefully consider your camera’s weight, the mounting surface, and environmental factors to ensure a secure and long-lasting setup. With thoughtful placement and proper maintenance, these innovative drill-free solutions provide robust security, offering you invaluable peace of mind.
Are you ready to enhance your property’s security without the hassle of a drill?
Frequently Asked Questions
Can I mount an outdoor security camera without drilling?
Yes, absolutely! Many outdoor security cameras can be mounted without drilling using methods like strong gutter clamps, heavy-duty weather-resistant adhesive strips on suitable surfaces (like vinyl siding or brick), or magnetic mounts on metal surfaces. Ensure the mounting method and camera are rated for outdoor use and can withstand local weather conditions for optimal performance and durability.
What’s the best adhesive for outdoor camera mounting?
The best adhesive for outdoor camera mounting is typically a heavy-duty, weather-resistant industrial tape, such as certain 3M VHB (Very High Bond) tapes or specialized outdoor mounting strips. These are designed to withstand various temperatures, moisture, and UV exposure. Always ensure the surface is meticulously cleaned and dry before application for the strongest bond.
How can I hide security camera wires without drilling?
To hide Security Camera wires without drilling, you can use adhesive cable clips that stick to walls or under eaves. Flat, paintable cable covers can also blend wires seamlessly with your wall. Indoors, run wires along baseboards, behind furniture, or under rugs for a discreet look. For windows, flat Ethernet cables can be a good option.