The constant barrage of unnecessary notifications from your security camera system can quickly turn a vital security tool into a source of frustration. Imagine checking your phone for an urgent alert, only to find it was just a leaf blowing across the yard or a bug fluttering past the lens. These “false alarms” erode your peace of mind and can lead you to ignore critical alerts when they truly matter. However, with the right approach to motion zone setup and camera configuration, you can dramatically reduce these unwanted interruptions, ensuring your security system works effectively without the constant noise.
Understanding False Alarms: Why Your Camera Cries Wolf
Security cameras typically detect motion by analyzing changes in pixels from one video frame to the next. While effective for spotting activity, this basic method is highly susceptible to environmental factors. Your camera isn’t inherently smart enough to distinguish between a swaying tree branch and an intruder without proper guidance.
Common culprits behind false alarms include:
- Environmental Factors: Wind-blown trees, bushes, and other foliage are frequent triggers. Rain, snow, and reflections on surfaces can also fool the system.
- Lighting Changes: Shifting sunlight, shadows cast by passing clouds or vehicles, and even car headlights at night can cause pixel variations that are misinterpreted as motion.
- Small Animals and Insects: A bird landing on your fence, a curious squirrel, or an insect crawling near the lens can be enough to set off an alert.
- Incorrect Placement: A camera pointed directly at a busy street or a frequently used public sidewalk will inevitably generate countless irrelevant notifications.
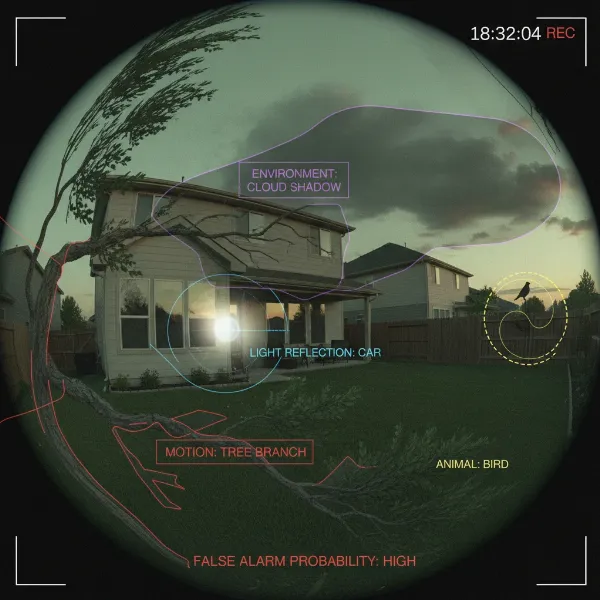 Security camera view showing common causes of false alarms like trees, shadows, and animals.
|
Our Picks for the Best Security Camera in 2026
As an Amazon Associate I earn from qualifying purchases.
|
||
| Num | Product | Action |
|---|---|---|
| 1 | Tapo 2K+ Indoor/Outdoor Wired Security Camera - 2024 PCMag Editors' Choice, Person/Pet/Vehicle Detection, Baby Monitoring, Color Night Vision, Subscription-Free Local Storage or Optional Cloud, C120 |

|
| 2 | aosu Security Cameras Outdoor Wireless, 4 Cam-Kit, No Subscription, Solar-Powered, Home Security Cameras System with 360° Pan & Tilt, Auto Tracking, 2K Color Night Vision, Easy Setup, 2.4 & 5GHz WiFi |
|
| 3 | Google Nest Cam Outdoor (Wired, 2nd Gen) - 2 Pack - Security Camera with 2K Video and Gemini, Night Vision, 2-Way Audio - Works with Google Home - 2025 Model - Snow |
|
| 4 | WYZE Cam Pan v3 Indoor/Outdoor IP65-Rated 1080p Pan/Tilt/Zoom Wi-Fi Smart Home Security Camera with Color Night Vision, 2-Way Audio, Compatible with Alexa & Google Assistant, White, 2-Pack |
|
| 5 | TP-Link Tapo 1080P Indoor Security Camera for Baby Monitor, Dog Camera w/Motion Detection, 2-Way Audio Siren, Night Vision, Cloud & SD Card Storage, Works w/Alexa & Google Home (Tapo C100) |
|
| 6 | 2K Cameras for Home Security-Outdoor/Indoor Camera for Dog/Cat/Pet/Nanny/Baby/Elderly, Color Night Vision, White Light, Siren, 24/7 SD Recordings, Works with Alexa, Plug in (C1-White-2pack-2.4G) |
|
| 7 | Tapo 1080P Indoor Pan/Tilt Wired Security Camera - Works as a Baby & Pet Monitor, Motion Detection, 2-Way Audio, Siren, Night Vision, Subscription-Free Local Storage or Optional Cloud, Black, C201 |
|
| 8 | WYZE Bulb Cam Security Camera, 2K HD Outdoor Light Bulb Camera, Color Night Vision, Dimmable LED Bulb, Motion Detection, Siren Alarm, Works w/Alexa/Google Assistant. Free Expert Support |
|
| 9 | Google Nest Cam with Floodlight - Outdoor Camera - Floodlight Security Camera, White, 1 Count (Pack of 1) |
|
| 10 | 2K No Drill Window Camera-2 Pack 2.4Ghz & 5Ghz WiFi Cameras for Home Security for Indoor & Outdoor Monitoring, Anti-Glare Color Night Vision, Human Detection, 24/7 Recording, Ideal for Apartment, K1 |
|
The Power of Motion Zones in Your Security Setup
Motion detection zones are specific, user-defined areas within your camera’s field of view where movement will trigger an alert. By customizing these zones, you essentially tell your camera what to “watch” and, more importantly, what to “ignore.” This granular control is the most effective way to cut down on false alarms.
Properly configured motion zones offer several significant benefits:
- Reduced False Alerts: By excluding areas prone to harmless motion, you receive fewer irrelevant notifications, keeping your focus on real threats.
- Improved Security Focus: Directing your camera’s attention to crucial areas like entryways, windows, and driveways ensures that important events are captured and alerted upon.
- Battery Conservation: For battery-powered cameras, fewer triggers mean longer battery life, reducing the frequency of recharging or replacement.
- Efficient Video Storage: Less recording of non-events saves storage space and makes it quicker and easier to review footage to find genuinely important incidents.
Step-by-Step Guide to Setting Up Effective Motion Zones
Implementing effective motion detection zones requires a thoughtful approach. Here’s how to optimize your settings for maximum efficiency and minimal false alarms:
-
Identify Critical Monitoring Areas: Begin by pinpointing the most crucial locations on your property that require surveillance. These typically include main entry points (front and back doors), ground-floor windows, driveways, garage entrances, and any areas where valuables are stored outdoors. These are the spots where you absolutely cannot miss an event.
-
Exclude Problematic Zones: Once your critical areas are defined, identify and exclude regions within the camera’s view that are known to cause nuisance alerts. These often include:
- Swaying trees, bushes, and tall grass.
- Busy roads, sidewalks, or neighboring properties with frequent activity.
- Reflective surfaces that might catch sunlight or headlights.
- Areas with constant, benign movement, like flags or wind chimes.
-
Draw Motion Zones Precisely: Most security camera apps or web interfaces allow you to draw custom polygonal zones. Take your time to create precise shapes that tightly encompass the areas you want to monitor, while carefully avoiding the “problem areas” identified in the previous step. Creating multiple, smaller zones for different areas of interest can provide even more refined control.
-
Adjust Sensitivity Levels: Sensitivity determines how much movement is required to trigger an alert.
- Start with a medium sensitivity level.
- Test the new settings at various times of the day and night to observe how different lighting conditions and environmental factors affect detection.
- Fine-tune the sensitivity for each zone independently. A zone covering a driveway might need a lower sensitivity to ignore passing cars in the distance, while a zone around a front door could have higher sensitivity for immediate detection.
- Lowering sensitivity helps ignore small or distant movements, such as a small animal or a distant car.
-
Test and Refine Continuously: The initial setup is just the beginning. Monitor your system’s performance over several days, reviewing alerts and footage. Make small, incremental adjustments to zone boundaries and sensitivity levels as needed. This iterative process of testing and refinement is key to achieving an optimal balance between security and peace of mind.
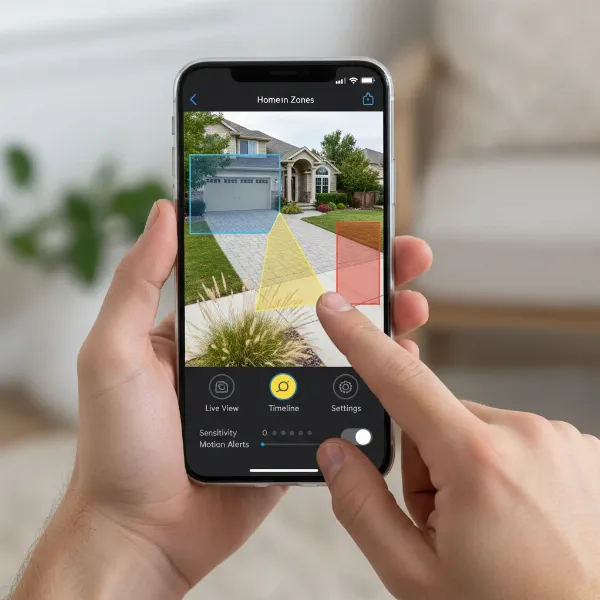 Smartphone screen displaying a security camera app interface for configuring motion detection zones.
Beyond Zones: Advanced Settings and Best Practices
While motion zones are fundamental, modern security cameras offer additional features and best practices that can further reduce false alarms.
-
Leverage AI and Smart Motion Detection: Many contemporary security cameras come equipped with AI-powered object recognition. This advanced feature can differentiate between humans, vehicles, and animals, allowing you to receive alerts only for specific types of motion. Activating “human detection” or “human + vehicle” modes can dramatically cut down on irrelevant notifications from pets or swaying branches. Remember, AI features perform best after your basic sensitivity and motion zones are already well-tuned.
-
Implement Scheduling and Time-Based Rules: Configure your camera to enable or disable motion detection for specific zones during certain times. For example, you might deactivate motion detection for a zone facing a bustling street during peak daytime hours when legitimate threats are less likely, or when you know the area will be busy with family activity.
-
Optimize Physical Camera Placement: Even perfect software settings can be undermined by poor camera positioning.
- Mount cameras at an optimal height, typically 7-9 feet off the ground. This reduces ground-level interference and provides a better vantage point.
- Angle the camera slightly downward, avoiding pointing it directly at bright light sources (like the rising or setting sun) or reflective surfaces, which can cause lens flare and sudden light changes.
- Utilize digital masking features if your camera offers them, to permanently block out specific problematic areas in the camera’s view that cannot be avoided by zone drawing (e.g., a neighbor’s constantly moving flag).
- Consider adding a small overhang or shield if the camera is exposed to heavy rain or direct sunlight, which can cause visual disturbances.
-
Stay Updated with Firmware and Software: Manufacturers frequently release firmware updates for their cameras and software updates for their apps. These updates often include improvements to motion detection algorithms, bug fixes, and new features that can enhance performance and reduce false alarms. Regularly checking for and installing these updates is a simple yet crucial step.
-
Regular Reviews and Seasonal Adjustments: Periodically review your motion detection settings and recorded footage. What works in summer might not work as well in winter when trees are bare or snow reflects light differently. Be prepared to make seasonal adjustments to your zones and sensitivity.
Common Issues and Troubleshooting
Even with careful setup, you might encounter issues.
- Still Getting Too Many False Alerts: Revisit your motion zones. Are there any small areas you missed excluding? Is the sensitivity still too high for certain zones? Consider leveraging AI features if available.
- Missing Actual Events: If you’re not getting alerts for legitimate activity, your sensitivity might be too low, or your zones might be drawn too restrictively. Expand zones slightly or increase sensitivity incrementally. Ensure your camera’s field of view covers all critical areas.
- Connectivity Issues: A camera that frequently disconnects can miss events or fail to send alerts. Ensure a strong Wi-Fi signal or a reliable wired connection.
Conclusion
Mastering motion zone setup is paramount for any effective security camera system. By carefully defining your detection areas, fine-tuning sensitivity, leveraging smart AI features, and optimizing physical placement, you can dramatically reduce the nuisance of false alarms. This meticulous approach ensures that your security cameras provide reliable, relevant alerts, offering true peace of mind and keeping your property genuinely secure. Don’t let overwhelming notifications deter you from the benefits of modern surveillance. Take the time to configure your system correctly, and you’ll find your Security Cameras become an invaluable asset.
What steps will you take today to refine your camera’s motion detection?
Frequently Asked Questions
How do motion detection zones work to reduce false alarms?
Motion detection zones allow you to define specific areas within your camera’s view that should trigger an alert, while ignoring movement in other, less critical or problematic regions. This prevents irrelevant movements like swaying tree branches or passing cars outside your property from generating constant, unnecessary notifications, focusing your camera’s attention where it truly matters.